Monday 28 July 2014

Prevent Negative Inventory


For many years clients have been asking for the functionality of preventing Negative entry. This has been provided by Microsoft in NAV 2013 R2. (This provision has been given by Microsoft in Inventory Setup).
 
clip_image003
If the Prevent Negative Inventory setup is marked at Inventory Setup then, Inventory has been checked for all Items.
If the Prevent Negative Inventory setup is not marked at Inventory Setup then, In Item Master there is field called Prevent Negative Inventory needs to be checked. In this scenario, The Inventory will get checked for those Items which are marked with Prevent Negative Inventory
clip_image005
In Standard Navision, I have observed that this Functionality only worked for Sales. But when I tried to post with Item journal and entry type is “Negative Adjt.”. The entry gets posted with negative Inventory. To prevent user from posting negative Inventory, I have done a small change in the function written in Item Ledger Entry Table Called “VerifyOnInventory”
Old Code
IF NOT Open THEN
  EXIT;
IF Quantity >= 0 THEN
  EXIT;
CASE "Entry Type" OF
  "Entry Type"::"Negative Adjmt.","Entry Type"::Consumption,"Entry Type"::"Assembly Consumption":
    IF "Source Type" = "Source Type"::Item THEN
      ERROR(IsNotOnInventoryErr,"Item No.");
  "Entry Type"::Transfer:
    ERROR(IsNotOnInventoryErr,"Item No.");
  ELSE BEGIN
    Item.GET("Item No.");
    IF Item.PreventNegativeInventory THEN
      ERROR(IsNotOnInventoryErr,"Item No.");
  END;
END;
New Code
IF NOT Open THEN
  EXIT;
IF Quantity >= 0 THEN
  EXIT;
CASE "Entry Type" OF
  "Entry Type"::"Negative Adjmt.","Entry Type"::Consumption,"Entry Type"::"Assembly Consumption":
//AK Start
  //IF "Source Type" = "Source Type"::Item THEN
  //      ERROR(IsNotOnInventoryErr,"Item No.");
    IF ("Source Type" = "Source Type"::Item) OR ("Source Type" = "Source Type"::" ") THEN
      ERROR(IsNotOnInventoryErr,"Item No.");
//AK End
  "Entry Type"::Transfer:
    ERROR(IsNotOnInventoryErr,"Item No.");
  ELSE BEGIN
    Item.GET("Item No.");
    IF Item.PreventNegativeInventory THEN
      ERROR(IsNotOnInventoryErr,"Item No.");
  END;
END;


Written by:Mr. Abhijit Kadulkar - More than 16 years of experience in Information Technology across multiple technology solutions.Presently working as Delivery Manager- Microsoft Dynamics NAV at Direction Software Solutions, Mumbai, India

Monday 21 July 2014

Interactive Reports in NAV 2013 R2–Drill Down

In continuation to my earlier post ‘Interactive Reports in NAV 2013 R2 – Dynamics Sorting’, in this session we will see how we can drill down from the report preview to more detailed data
————————————————————————————————————
You can refer to my earlier post describing interactive sorting in NAV 203 R2 in the following link -
Interactive Reports in NAV 2013 R2
————————————————————————————————————
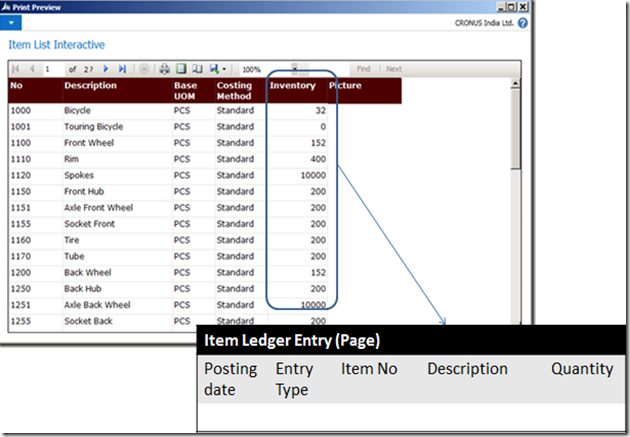
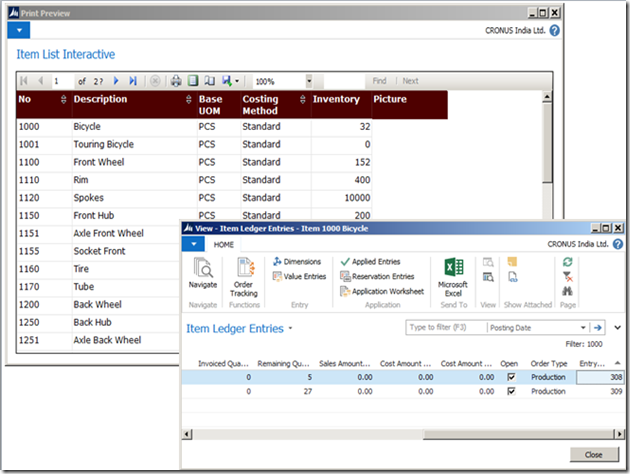
We will use our existing report designed in my last post [Interactive Reports in NAV 2013 R2] and will incorporate a drill down facility from the ‘Inventory’ column in the report to the Item Ledger Entry corresponding the the report’s item No. Probably the design should be as below -
image
Now to achieve this we need to do 3 things -
  • Create a link to ‘Item Ledger entry’ page (Page no 38) and
  • Connect the same link with ‘Inventory’ field in the report and
  • Enable your report to use an external link (URL)
Create a link to ‘Item Ledger entry’ page:
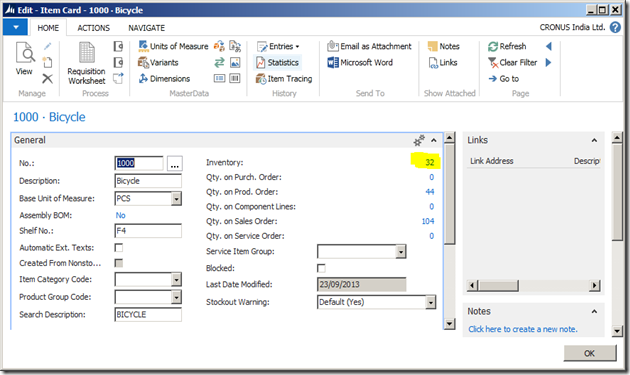
Creating a link to a page in NAV 2013 R2 is simple. Open any Item Card and drill down from the inventory field -
image
This will open the ‘Item Ledger Entry’ page filtered out by the item from whose card you are drilling down -
image

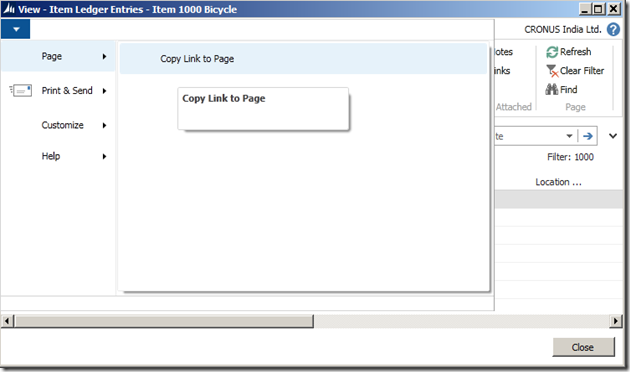
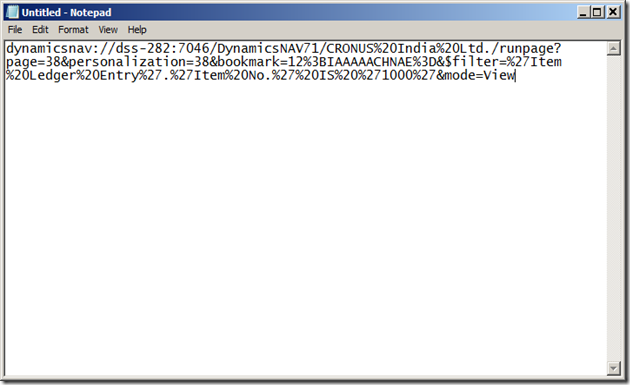
Click on the down arrow key in the upper left corner of the page and go to Page > Copy Link to Page. Open a notepad and paste the link (you need to further edit it)-

image

here is the link URL pasted (This link relates to my NAV server and Company):
This link contains lot of information about the target page and some part of this link can easily be removed to make it more generic. This link has the following information -
Link Text
Purpose
Target Server Instance and port no
/CRONUS%20India%20Ltd.
Target Company
./runpage?page=38&personalization=38& bookmark=12%3BIAAAAACHNAE%3D&$
Target page no 38 and bookmarking
filter=%27Item%20 Ledger%20Entry%27.%27Item%20No.%27%20IS%20%271000%27
Filer information. Here the data is getting filtered by ‘1000’ on ‘Item No.’ field in target data (Item Ledger Entry)
&mode=View
Open the page in View mode

So I will remove the ‘Target Server’, ‘Port No’, ‘Target Company’ and the ‘Personalisation’ part to make it usable for any server, any database or company (you can port this object to any other database in any other server and it will work fine). post my changes, the link will look like this -
dynamicsnav://///runpage?page=38&filter=’Item Ledger Entry’.’Item No.’ IS ’1000′&mode=View
[I have replaced the %20 with space and %27 with a single quote (‘)]
Right now the above link will open the Page 38 filtering the ‘item ledger entries’ with the Item No. ‘1000’. We need to change it further to make it filter data dynamically with the item no from the report. We will make this change directly in report builder in our next step.
Connect the same link with ‘Inventory’ field in the report:
Open the report in NAV 2013 R2 development environment and go to View > Layout. This will open the report layout in SQL Server Report Builder.
________________________________________________________________
Note: To learn how to use SQL Server Report Builder 3.0 (instead of Visual Studio 2013) for NAV 2013 R2 report layout designing, you can refer to my earlier post NAV 2013 R2 Report layout design with Report Builder
__________________________________________________________________________________________________________
image
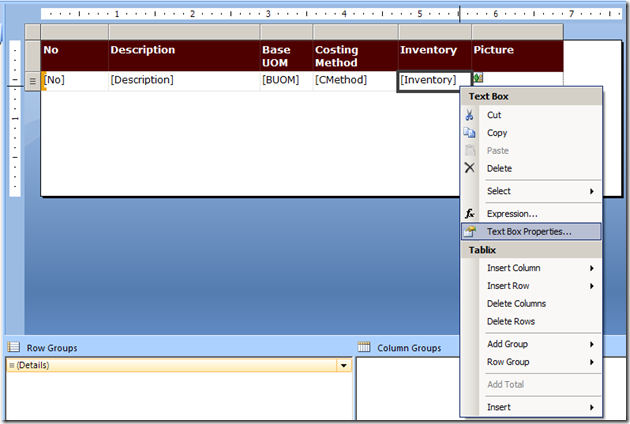
Right click on the ‘Inventory’ textbox and go to ‘Text Box Properties’.
image

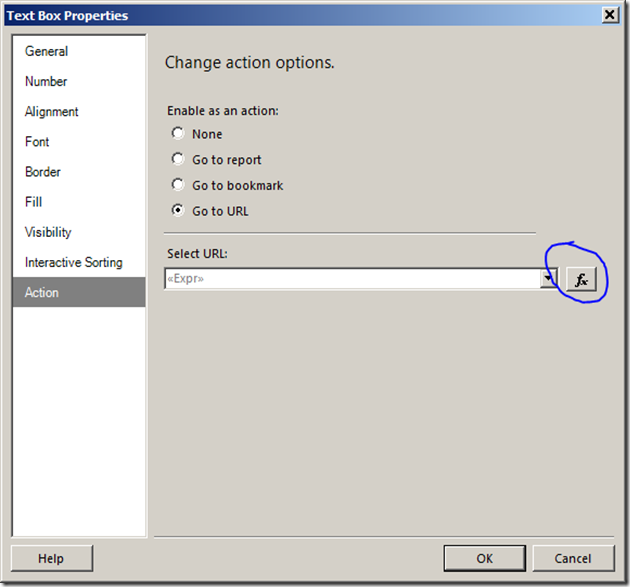
Go to ‘Action’ tab and select the radio button in ‘change action option’ to ‘Go to URL’. After this click on the ‘fx’ (as circled above) button next to ‘Select URL’ text box.

image
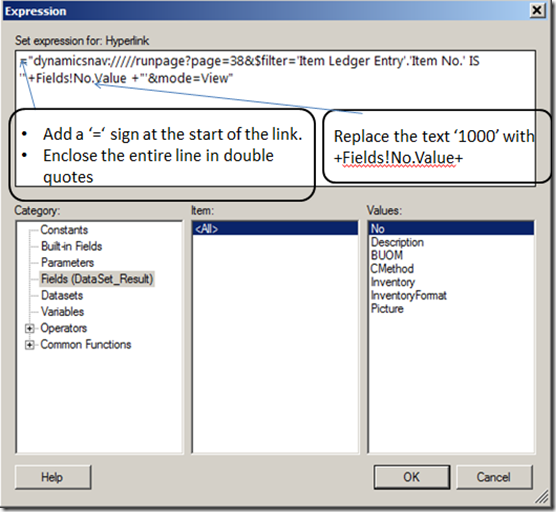
Here I have modified the URL with the following changes:
  • Added a ‘=’ sign in front of the URL
  • Included the entire URL inside double quotes
  • Replaced the text ‘1000’ (the item no) with the text ‘+Fields!No.Value+’. This makes the URL to pick up the Item No. from the value displayed in ‘No.’ field in report.
________________________________________________________________
Instead of manually typing it, you can actually select the ‘Fields (DataSet_Result) in Category box, Select ‘<All>’ in Item box and then  double click on ‘No.’ in the Values box.
________________________________________________________________
Post the above changes, my final URL looks like this -
=”dynamicsnav://///runpage?page=38&$filter=’Item Ledger Entry’.’Item No.’ IS ‘”+Fields!No.Value +”‘&mode=View”
Now the field ‘Inventory’ is perfectly linked to the page 38 (Item Ledger Entry). Next let us complete our 3rd step -
Enable your report to use an external link (URL):
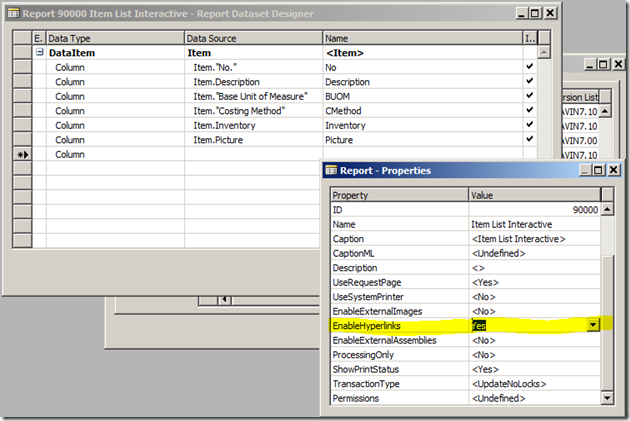
Save the report layout and come back to NAV 2013 R2 development environment (Report designer). Go to a blank line at the bottom of the report and click on View > Properties -
image

Change the property ‘EnableHyperlinks’ to ‘Yes’.
And that’s it. You are ready with your NAV 2013 R2 interactive report from where you can drill down to more detailed data. Let us test the same.
Save the report and run it from the Object designer itself (that’s the good thing you can do in NAV 2013 R2 but not in NAV 2009 Smile).
Once the request page opens, just click on the ‘Preview’ button. This will open the report viewer window. Hover your mouse on the ‘Inventory’ field values and you will see the cursor is getting changed to a ‘hand’ denoting that you can drill down from that value. Click on the value and Item ledger entry page will open up with the entries corresponding to the item no in the report.

image

Try and see if all values are opening it’s corresponding item ledger entries only.
Hope you are able to follow the steps mentioned here in creating your own interactive reports. You can leave your comment here in case you face any difficulty or you can write to me on the same.
Catch you in my next post / session on NAV 2013 R2. Till then happy reading.

Written by:
Mr. Snehanshu Mandal is a technologist having more than 11+ years of experience in experimenting and building commercially viable usage of different technology solutions.Presently working as Practice Head - Microsoft Dynamics NAV at Direction Software Solutions, Mumbai, India.

Multiple Active Resultsets (MARS) In NAV 2013

There are a lot of things that have changed from NAV 2009 R2 to NAV 2013. Microsoft Dynamics NAV Server has been re-written by Microsoft to use ADO.dotnet instead of ODBC.
The New interface managed data access layer of Sql Server. Which decreases the consumption of memory. It also makes the 3 box installation very easy by simplifying Sql Server Connection Pooling.
There has been no more one to one connection between NAV client and Sql Server Connection. Previously each connection consumed 40 MB of Memory. Now Memory allocation is in a Managed Manner which is more efficient. For eg If the users are connected to one NAV server Instance where one user reads a record, a second user can read the record from the same cache. This cache is called as Data Cache.
There are 2 types of Data Cache; Global and Private. Global Cache is for all users connected to a Microsoft Dynamics NAV Server instance and Private cache is per user, per company, in a transaction scope. Data in a private cache for a given table and company are flushed when a transaction ends.
(It means, for better performance the memory should be good where the Navision Service Tier lies.)
Microsoft Dynamics NAV 2013 no longer uses server cursors to retrieve records. Now records are retrieved using MARS (Multiple Active Result sets). In NAV 2013 the option for Record Set Property no longer exists.

Written by:
Mr. Abhijit Kadulkar - More than 16 years of experience in Information Technology across multiple technology solutions.Presently working as Delivery Manager- Microsoft Dynamics NAV at Direction Software Solutions, Mumbai, India

How to Handle number of Users and Allotment of time to a particular user in NAV 2013


I have come across one interesting point for handling no of users and the allotment of time to particular user in NAV 2013. Let us take one scenario where the number of user license in NAV is 30, and actual NAV users in the organization are around 48.
Out of these 48 users are divided into 4 departments (Finance, Sales, Purchase & Warehouse). Out of these users, Finance users are continuously connected to the database. Sales users and Purchase users are generally connected in the afternoon. And the warehouse department is generally connected in the evening.
In this case, we can create multiple NST (Navision Service Tier) Department wise. Each NST is attached to a domain and a Port. In active directory services, the system administrator can allot time slots to open a particular port for a particular time for a particular user.
In Navision there is no facility for controlling the time line of users but we can control it through ADS (Active Directory Services) and Firewall.
If you have create multiple NST, it will be very useful both from a Performance perspective as well as from the point of debugging.

Written by:
Mr. Abhijit Kadulkar - More than 16 years of experience in Information Technology across multiple technology solutions.Presently working as Delivery Manager- Microsoft Dynamics NAV at Direction Software Solutions, Mumbai, India